Use the available SPI Flash filesystem on some ESP8266 and ESP32 boards to store various files and resources for web servers such as images, CSS styles and configuration files. Arduino IDE plugins make it easy to upload files.
ESP8266 and ESP32 development boards have SPI flash memory used mainly for program storage. But, if there is enough space, the flash memory can be "partitioned" and used for other purposes. Making a SPIFFS (SPI Flash Filesystem) partition has some advantages. Even though file system is stored on the same flash chip as the program, programming new sketch will not modify file system contents. Since ESP development boards have WiFi connectivity it's easy to think of something useful to do with SPIFFS. For example a web server can store images, scripts, styles and even HTML files that will be used to create the web interface. Another usage would be to create a data log that can be downloaded via a web interface.
Obviously SPIFFS data can be read/written from other interfaces, including serial monitor. If you're developing a web server on ESP8266/ESP32 you'll want an easy way to upload server files to SPIFFS. Fortunately, there are plugins for Arduino IDE that handle this process. We will see how to do this and then check for the existence of files on the SPIFFS partition.

SPIFFS is a basic "filesystem" which does not support directories, it just stores a “flat” list of files. But contrary to traditional filesystems, the slash character / is allowed in filenames. There is a limit of 32 chars in total for filenames (in fact only 31 are usable). Keep these in mind since problems might be hard to debug. There are no compilation or upload errors, just that your files would not be opened by the program.
It's also important to read the documentation for your development board. Not all have the same flash size. SPIFFS size is limited by overall flash size and program (sketch) size. These are the available SPIFFS sizes for ESP8266 boards. With ESP32 things are more complex and partition images can be created with different tools and flashed with esptool. We'll keep things simple and use a plugin for Arduino IDE. Depending on the development board you choose, you can have the option to select SPIFFS size or no option at all. For the board I have, the menu option is not quite what I would expect: Minimal SPIFFS (Large APPS with OTA). The partition documentation can be found here and these are specific partition table used by Arduino package for ESP32. Let's not worry for that; SPIFFS size can be determined programmatically.
Access SPIFFS
Let's write a simple sketch that loads filesystem driver, determines total SPIFFS size and used space and checks the existence of a file. For this guide only serial output available.
#include "FS.h"

#ifdef ARDUINO_ARCH_ESP32
#include "SPIFFS.h" // ESP32 requires this header
#endif

void setup() {
  Serial.begin(115200);
  delay(100);

#ifdef ARDUINO_ARCH_ESP32
  SPIFFS.begin(true); // enable format if mount fails (only for ESP32)
#else
  SPIFFS.begin();
#endif
  delay(100);

  Serial.println("SPIFFS Information:");
#ifdef ARDUINO_ARCH_ESP32
  // different methods of getting information
  Serial.print("Total bytes:    "); Serial.println(SPIFFS.totalBytes());
  Serial.print("Used bytes:     "); Serial.println(SPIFFS.usedBytes());
#else
  FSInfo fs_info;
  SPIFFS.info(fs_info);
  Serial.print("Total bytes:    "); Serial.println(fs_info.totalBytes);
  Serial.print("Used bytes:     "); Serial.println(fs_info.usedBytes);
  Serial.print("Block size:     "); Serial.println(fs_info.blockSize);
  Serial.print("Page size:      "); Serial.println(fs_info.pageSize);
  Serial.print("Max open files: "); Serial.println(fs_info.maxOpenFiles);
  Serial.print("Max path length:"); Serial.println(fs_info.maxPathLength);
  Serial.println();
#endif

  if (SPIFFS.exists("/readme.txt")) {
    Serial.println("Found sample file.");

    File f = SPIFFS.open("/readme.txt", "r");
    if (!f) {
      Serial.println("Failed to open file for reading");
      return;
    }
    Serial.println("Opened file for reading. File contents:\n");

    while (f.available()) {
      Serial.write(f.read());
    }
    f.close();

    Serial.println("\n\nEnd of file contents.");
  }
  else Serial.println("Sample file not found.");
}

void loop() {

}
This was my output with ESP32 Wemos Lolin 32, configured with Minimal SPIFFS in Arduino IDE.
SPIFFS Information:
Total bytes:    173441
Used bytes:     0
Sample file not found.
The sketch is written for compatibility with both ESP8266 and ESP32. The latter requires an additional header and the method of getting filesystem parameters is a bit different.
Arduino IDE Plugins
The esptool and other tools based on it have the ability to upload files to SPIFFS. This is the back-end used by the Arduino IDE plugins we will install. Besides having Arduino IDE installed with ESP8266 and ESP32 boards, Python is also required.
- Download and install the latest Python. When prompted by the installer, choose to add it to path. Log out and then back in for the changes to path to take effect. If you're using Linux, use the default package manager to install Python.
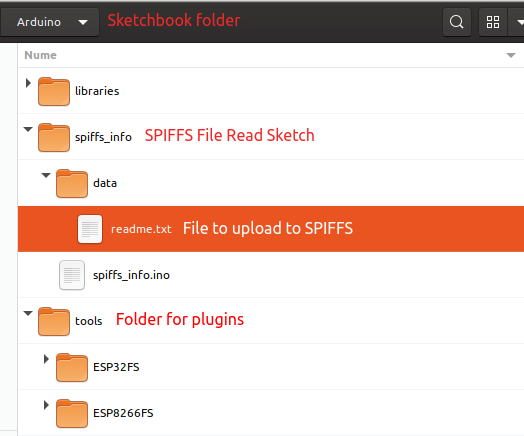
- For ESP8266 use ESP8266FS Plugin. Download the archive. There will be a folder in this archive called ESP8266FS. Put this folder in your sketchbook location, tools subfolder. Create this subfolder if it does not exist.
- For ESP32 use ESP32FS Plugin. Download the archive. There will be a folder in this archive called ESP32FS. Put this folder in your sketchbook location, tools subfolder. Create this subfolder if it does not exist.
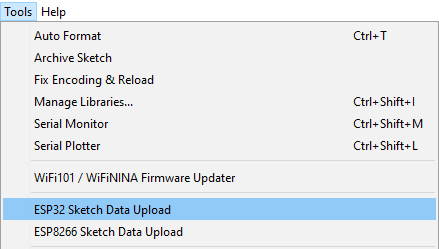
The sketchbook folder is by default in User's Documents, Arduino for Windows users. On Linux it is ~/Arduino. Launch Arduino IDE and if you placed the plugins in the correct directory you should have some new menu items in Tools.

ESP8266 and ESP32 SPIFFS data uploader plugins in Arduino IDE
Upload files
It's time to actually upload a file and use the above sketch to check it existence. Open the sketch and hit Ctrl+K to browse its folder. Make here a new folder named data. Place whatever files you want to upload to SPIFFS here. Pay attention to potentially long file names, subfolders and total size. Let's make a readme.txt file and write some text into it.

Sketchbook folder structure
Make sure that Serial Monitor/Plotter is closed, go to Tools menu and choose the correct uploader for the board you have. The upload will start and board will be reset. After this you can reopen Serial Monitor. This is a part of the log:
Writing at 0x003d0000... (100 %)
Wrote 196608 bytes (473 compressed) at 0x003d0000 in 0.1 seconds (effective 13677.1 kbit/s)...
And the sketch is able to open the file and read its contents. Note as well the used bytes.
SPIFFS Information:
Total bytes:    173441
Used bytes:     502
Found sample file.
Opened file for reading. File contents:

Hello from ESP8266/ESP32 SPIFFS.

End of file contents.
The text Hello from ESP8266/ESP32 SPIFFS. has only 32 bytes. File name length is 9 bytes (including extension). I don't quite understand why it uses 502 bytes of SPIFFS space. By looking at the log it seems that a partition image was created and it was compressed before being sent to development board.
Conclusion
Once you got the SPIFFS plugins installed in Arduino IDE, it gets easy to store files on the development board memory. Now you can create standalone web server pages with custom styles and even small images served to clients. You can also store custom logs or configuration files. Unless you choose to format it, SPIFFS is kept after new sketch upload.


regarding "The text Hello from ESP8266/ESP32 SPIFFS. has only 32 bytes. File name length is 9 bytes (including extension). I don't quite understand why it uses 502 bytes of SPIFFS space."
ReplyDeleteActually what happens is probably that you used one minimal block which is of that size.
This is similar when you use a toiled - it doesn't matter how big or small you are - you are occupiing the whole alocated space which is sufficient but with predefined size. So all area in squere meters/ feets is being occupied. That is how hard disks were functioning, and is the similar for any other modern storage (SSD, micro SD cards and this case SPIFFS as an another "FS" file system.
I thought so. However I would have expected a different block size (maybe 512). Thanks for the information.
Delete