Compile vserprog firmware for XTW100 programmer and use it with SPI flash memory chips and flashrom utility
I have bought the XTW100 Mini Programmer and while attempting to read the firmware of the STM32 MCU using an ST-Link programmer, somehow I erased the flash and got a totally useless piece of hardware. XTW100 is advertised as a better replacement for the CH341A based programmers and after tracing the schematic I failed to find any reasons why it should be better. The information I gathered can be found here.
With the original firmware, the programmer should be able to interface SPI and I2C EEPROMs and flash memory chips. However, since I have no way of getting that back to test whether the programmer works or not, I found there is an open-source firmware available. Unfortunatety, it does not come with I2C support.

With the original firmware, the device IDs were 1fc8:300b. It required a libusb based driver which has some issues while installing on Windows 10. The programming utility is a Windows only tool with Chinese user interface. No other programming tools are known.
Despite the lack of I2C, the alternative firmware stm32-vserprog from Chi Zhang is open-source and fully compatible with serprog protocol used by flashrom. If you didn't know, this is a cross-platform command line utility for identifying, reading, writing, verifying and erasing flash chips.
Flash the new firmware
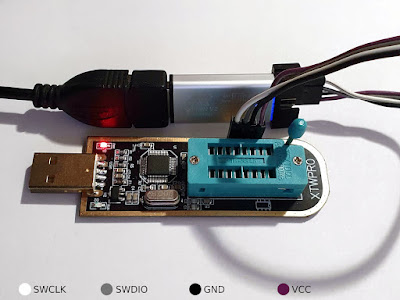
First of all, you need the binary firmware. I built it from current sources, so you don't have to. Download XTW100-vserprog (built in April 2021 - I will not update it, if you need newer version, build it from source). You also need the ST-Link programmer (even clones work) and a pinheader is required to be soldered in the programming port of XTW100. This is a 4-pin port next to one of the sides of ZIF connector. Pin configuration is, from handle end: 3.3V [V], GND [G], SWDIO [D], SWCLK [G]. The latter is marked on PCB as "G", although they should have probably marked it "C" from clock.

Connect ST-Link to XTW100 for programming STM32 MCU
After you have made the connections, you need the programming utility. I recommend the official STM32CubeProg which has the advantage to be free and cross-platform. You are requested to enter a valid e-mail address to get download link. Extract the downloaded archive and install STM32CubeProg. Plug ST-Link into the USB port and launch the programming utility. First of all, connect to ST-Link programmer (1), then open firmware file (2) and download it to STM32 memory (3).

Use STM32CUbeProg to write new firmware to XTW100
Linux users who do not want to install STM32CubeProg, have the option to install stlink-tools package and use st-flash command line utility. Usage is straightforward:
st-flash --reset --format binary write /path/to/xtw100-vserprog.bin 0x08000000
You're done. Disconnect the programmer from the... programmer and plug XTW100 in any USB port. Its red LED should light and it will (probably) be installed as serial port on your system. The USB IDs are now:
ID 0483:5740 STMicroelectronics Virtual COM Port
Need a driver on Windows? Use official STM32 VCP driver. Move to the XTW100 tests section to see how to use your new programmer.
Build the firmware
If you want/need to build the firmware yourself, a Linux machine is needed (it should be possible to build on Windows too with the right compiler and tools). I used Ubuntu. These are the commands:
sudo apt install gcc-arm-none-eabi libnewlib-arm-none-eabi git
git clone --recurse-submodules https://github.com/dword1511/stm32-vserprog.git
cd stm32-vserprog
make BOARD=xtw100
Before exiting, make will print on console the folder where it ran and this is the folder where you will find the binary named stm32-vserprog.bin. This is the file that needs to be programmed to STM32.
If you have the programmer connected as per previous section, while you're in the same build folder, the following commands will burn the binary to MCU.
sudo apt install stlink-tools
make BOARD=stm32-vserprog-v2 flash-stlink
Otherwise, check the alternate methods in previous section for flashing the binary to MCU.
XTW100 tests
The first SPI flash I found was an old W25X80 used to store BIOS of an old motherboard. The size of this chip is 1 megabyte and XTW100 with this firmware did a good job reading and writing it. The first thing that is changed is chip placement in the blue ZIF connector. According to the schematic I draw in the previous post, I came to believe SPI flash chips should be placed in the ZIF half which is closer to USB connector.
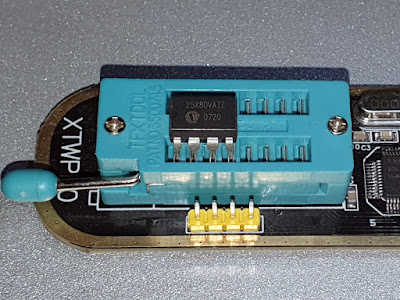
But not with this new firmware. 25 series flash chips must be placed in the ZIF half next to the handle, with pin 1 close to the handle. Voltage supply and I/O levels are 3.3 V, compatible with a lot of chips. For 1.8 V devices, you will have to use a level shifter.

SPI Flash placement in ZIF socket with vserprog firmware
To my surprise, reading was much faster than CH341A. This is because SPI clock frequency of STM32 MCU is set to (probably) 8 MHz. Read data is accurate.

SPI clock and data captured on oscilloscope
Using flashrom shouldn't be too complicated. Here are the commands for reading, erasing and writing (includes automatic erasing) any supported flash memory.
flashrom -p serprog:dev=/dev/ttyACM0:4000000 -r dump.bin
flashrom -p serprog:dev=/dev/ttyACM0:4000000 -E
flashrom -p serprog:dev=/dev/ttyACM0:4000000 -w new_data.bin
flashrom starts probing the chip and tries to detect type. If you want to skip this check or if flashrom fails to auto-detect chip type, you can specify it as an argument. To get the list of all supported devices, run flashrom -L. See the screenshot below, where I specified W25X80 chip.

Using flashrom to read SPI flash with XTW100
Conclusion
In the end, I consider stm32-vserprog a better firmware for XTW100. Having as disadvantage the lack of I2C support, this new firmware is open-source and compatible with the cross-platform (and open-source) programming utility flashrom. Reading and writing of 25 series flash memory chips is much faster than using CH341A and XTW100 programmer is fully 3.3 V compatible.
As a note of caution, be careful what arguments you pass to flashrom. This tool has the ability to erase/write your motherboard's memory chips!


Hello Cornelius ! Thank you very much for information. Unfortunately, the compiled firmware(April 2021) from link is no longer available. Is it possible to post it again?
ReplyDeleteYes, here it is: https://github.com/onetransistor/download/blob/master/other/xtw100-vserprog.bin
ReplyDeleteThank you !
DeleteBuild date 07.09.2024 - https://mega.nz/file/73o0FADS#32ZCf2bnHCdyC1ywAEASK8qKb3AzEPzdBelE7DcWBn8
DeleteУ меня почему то как с заводской прошивкой так и с обновленной не видит софт программатор. Компьютер как USB устройство видит, драйвера в порядке. У меня софт конечно криво переведен, не на русском. Если можете поделится русскоязычным.
ReplyDelete