Enable multiple listeners on Mosquitto MQTT server with different security settings for each one
In the previous post I installed Armbian on an Orange Pi Zero single board computer (SBC). I intend to use this device for IoT and home automation, therefore I wanted to have a running MQTT server (broker). I prefer a self-hosted broker instead of a remote one hosted at a 3rd party company. In this way I have full control and I am sure sensitive data stays in the home network. Nevertheless, current SBC devices have enough processing capabilities and are energy efficient.
In this post I will configure the broker software. I want the server to listen for unencrypted connections on a port available for local clients only. It should also listen for encrypted connections on ports that I will open for remote access. There are two kinds of TLS connections: PSK (pre-shared key) and SSL certificate. The certificate will be self-signed and generated with OpenSSL (in a follow-up post).

The configuration file contains groups of settings: global options, listener options (I will have three) and security options. I will go over any additional files that need to be created for each type of listener, then at the end I will show you the full configuration file. For example, the user credentials file may be used for both the unsecured listener and for the certificate listener, therefore showing chunks of the config file is not what I want to do.
All of the following steps are performed in Armbian terminal, over SSH or serial port. I prefer SSH and I connected in Windows Powershell using the command ssh username@device_ip (according to the setup from previous post I used ssh cornelius@192.168.1.4). Account password must be entered when asked for and you should be able to log in.
Unsecured listener
I'll set the broker to accept unsecured clients on default 1883 port. I will definitely not open this port (on the internet router/gateway) to allow remote access to it, but it will be the port used by all local clients. Since nobody else but me has physical access to the home network and WiFi is password protected, there is no need for secured MQTT in local network. I do not want clients to log in without a password. Let's make passwords for a couple of users (clients). I will make a directory to store this password file (which is just a plain text file), then use a command to add the first client with its password. Further clients are added with a small modification of the initial command.
sudo mkdir /etc/mosquitto/passwd/
sudo mosquitto_passwd -c /etc/mosquitto/passwd/pass.txt Self
After the second command, I am prompted to set a password for Self client (you'll see later why this client is named like that). Subsequent clients are added with this command (argument -c is no longer needed):
sudo mosquitto_passwd /etc/mosquitto/passwd/pass.txt Cornelius
I recommend opening this file with a text editor each time a client is no longer in use and remove its entry. Entries in this file are in the form of ClientName:EncodedPassword, a line for each client.
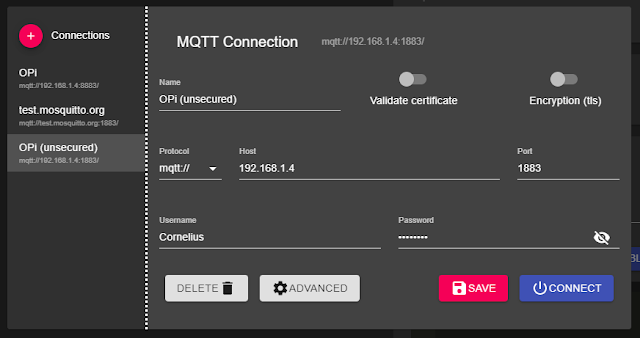
Passwords are the first layer of security. I wrote a bit about the available layers of security in this post. Multiple clients may use the same credentials. Feel free to test the connection using MQTT Explorer or any other client software you want.

Connect to MQTT broker on unsecured port
PSK listener
In some performance constrained environments, yet where a high level of security is needed, PSK is a good choice. Keys are stored in a plain text file, just like user credentials. The key is made of digits and letters A to F (hexadecimal numbers). Both the server and the client must know this key to establish connection.
The format is hint:key. The hint replaces the username, while key is the password. How to generate a key? Since I'm on Linux, I can open the terminal and compute the md5sum of a file. You can make the file anyway you want. I like to use nano editor. This is how you open the editor (keep in mind that the folder passwd should already exist - in my case it was made when I created the password file):
sudo nano /etc/mosquitto/passwd/psk.txt
And an entry could look like this (write/paste hint and key in this format):
Test1:20a7da651a0743214cde51050398cf34
When you are done editing the file, press Ctrl+O, then Enter and Ctrl+X. I wasn't able to connect with PSK from MQTT Explorer, but as I read it should be easy to do on Arduino/ESP8266/ESP32 with WiFiClientSecure::setPreSharedKey(hint, key);and PubSubClient library (I have to try this).
Certificate listener
Since this is by no means a short topic, I will explain it in a future post.
Mosquitto configuration
This is the last step before getting a fully configured server. I will configure three listeners in Mosquitto software, each with its own security settings. Unsecured connections are accepted on port 1883, PSK secured clients can use port 8882 and clients with certificates will connect over port 8883 (next time).
# Global
per_listener_settings true

# Default listener
port 1883

# PSK listener
listener 8882
psk_hint "mqttbroker"
use_identity_as_username true

# Certificate listener
# -- coming soon --

# Security
allow_anonymous false
password_file /etc/mosquitto/passwd/pass.txt
psk_file /etc/mosquitto/passwd/psk.txt
This is the almost complete configuration. The file is etc/mosquitto/conf.d/mosquitto.conf. As before, I used nano editor to create/edit it. After you save it (press Ctrl+O, then Enter and Ctrl+X to save file and exit.), restart the server to apply the new settings (using systemctl).
sudo nano /etc/mosquitto/conf.d/mosquitto.conf
sudo systemctl restart mosquitto
Self publishing
The server is now running, yet I don't have any devices publishing data. It is easy to get Armbian to publish CPU temperature of the Orange Pi board. Let's create a script:
mkdir ~/pub
cd ~/pub
nano ./publi.sh
Paste the following contents and modify the password with the one you assigned to user Self (or whatever user/password combination you created in the password file):
#!/bin/bash

while true;
do
        CPUTEMP=`cat /sys/class/hwmon/hwmon0/temp1_input`
        mosquitto_pub -h localhost -p 1883 -u Self -P <password_assigned_to_self> -t CPUTemp -m `echo "${CPUTEMP:0:-3}.${CPUTEMP: -3}"`
        sleep 5;
done
Press Ctrl+O, then Enter and Ctrl+X to save file and exit. Make it executable:
chmod +x ~/publi.sh
Let's run this script at start-up by editing rc.local. Run sudo nano /etc/rc.local and insert, before line exit 0 (very important!), the following line:
bash /home/your_username/pub/publi.sh &
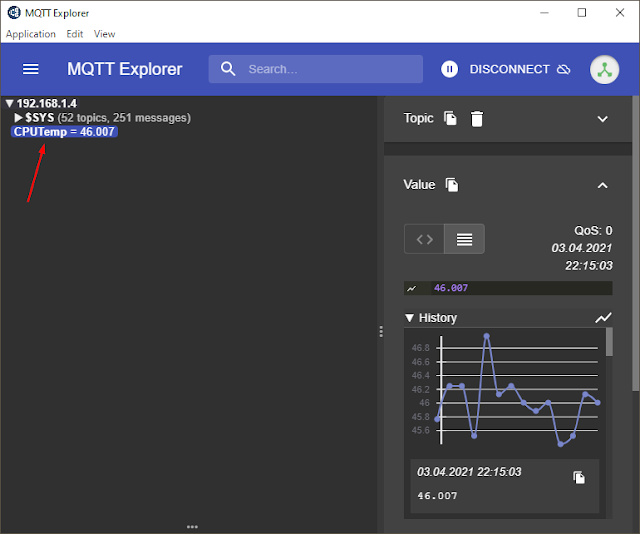
Replace your_username with your account name. Save and exit (you know the commands). Reboot and enjoy. In the screenshot below connection is made with the parameters from above (in Unsecured listener section).

Connected to MQTT broker, with CPUTemp subject selected
Follow-up
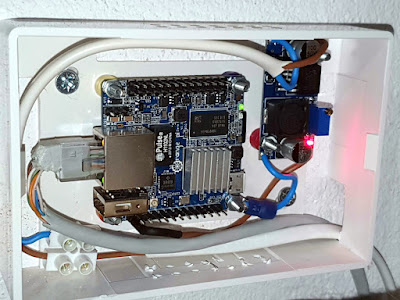
My Orange Pi Zero board running Armbian and Mosquitto is now installed in a 12 x 8 x 3 cm plastic box placed on a wall. The power is 12 V from a 1.25 A supply, down converted to 5 V by a LM2596 board you can see in the box. The Ethernet connector on the cable is ugly because I had to chop it off a bit to be able to bend it. The other end goes to a port on the router. Note the top and bottom holes I drilled for ventilation.

Orange Pi installed in a plastic box, with power supply module
If you followed this, now you have a local, self-hosted MQTT broker, which is ready to accept clients. Use the local IP to connect local clients. In the next part, I will deal with port 8883 for secured clients (I need a domain name from a dynamic DNS service provider and I will open port 8883 to the internet in order to connect from anywhere).


No comments :
Post a Comment
Please read the comments policy before publishing your comment.