What are the advantages of running your local MQTT broker and how to configure an OpenWrt router for this purpose.
Nowadays, microcontrollers with internet connectivity are cheap and popular. Actually, not quite internet connectivity, but network interface (mostly wireless). Also, to those MCUs that do not feature this, you can connect various network or WiFi modules (known as shields). It's now easy to connect almost anything to the big network starting from a simple LED or relay.
There are plenty of projects on this topic. Most of them make use of development boards based on Espressif platform, because they are cheap and have built-in wireless LAN connectivity. An you can run basic web servers on these that offer a web interface where you can display or change parameters from any device with web browser. But that's not what everybody needs. Sometimes, the development board is just a member in a network that includes other things too.
A common protocol was needed to allow communication between devices in the network of things. Actually, one has been around a while, way before these development boards became so cheap and available. It's the Message Queuing Telemetry Transport protocol (or MQTT), which is now an ISO standard. Used wherever small amounts of data needs to be transferred, it works on top of TCP/IP.

MQTT requires one server (broker). Clients publish messages to the broker and subscribe to it to receive messages. The "message" is just plain binary data. A lot of people develop MQTT enabled IoT devices without owning a broker. They use online brokers instead, which are just MQTT servers hosted by a third party. Why do this? When you have the knowledge to develop your own client, why send (private) data from it to a third party which may - or may not - share it to other parties.
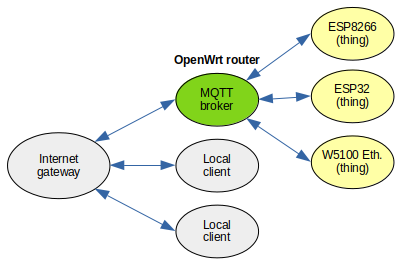
In fact, the MQTT broker is easy to set up in your local network. It runs on all operating systems and platforms. In this post, I'll talk about MQTT security and I will set up a router, with a separate network for things only. This allows more control over who has access to your network connected things. The router will be a client on your home network and the broker will be behind a firewall.
MQTT Security
Security and privacy are the main advantages of hosting your own broker. Depending on the network configuration and MQTT settings, there are multiple layers of security.

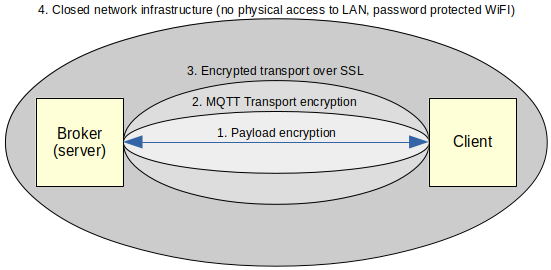
MQTT Layers of security
The inner most layer is about payload (the data you're exchanging). It can be encrypted by the client before being published. The broker will not be able to decode it. But clients that are subscribed to this encrypted topic must know to decode the payload. Encryption and decryption is implemented by the developer.
Next layer is the transport encryption using MQTT features. This includes access control rules and user/password access. You can configure what topics a client may subscribe or publish to. The client can be informed that the broker does not accept the message or not. Access control rules are safe, being on the server side. But user password parameters are vulnerable, because they are sent over TCP/IP in plain text.
However, MQTT can transport packets over TLS/SSL. That's the next layer of security. MQTT over TLS/SSL is just as secure as HTTPS. The disadvantage is that it requires more processing power from the clients and server. It's not a problem with the server, but microcontroller resources are few and important. Yet, this is the way to encrypt MQTT if you're connecting to a remote broker over the internet.
The last security layer is the network infrastructure. This is under your control only if you're running your own server. A secured wireless network and a wired network where only you have physical access are very secure. You can very well discard the previous layers if you know for sure that no one else can get in your network.
Local network
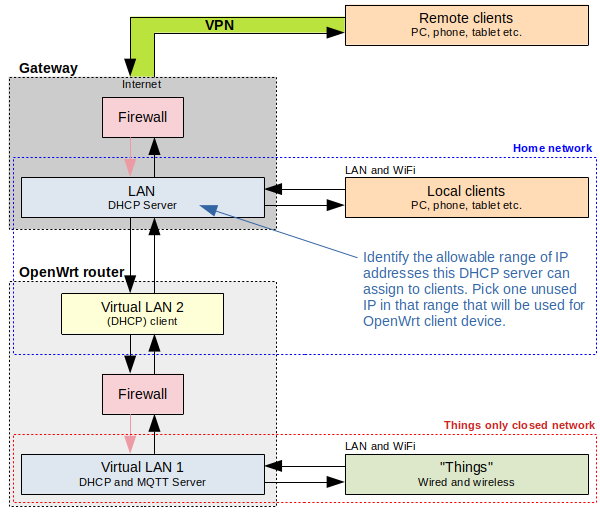
So, I get to the following setup, where the things have their own network, behind a firewall.

Overview of the network of things
For development, which is what most of beginners do, nothing will get past the gateway firewall. In the end I will want to allow access to broker from internet. And I have full control over this: I can either use a VPN, or I can add an additional listener with stronger security that can be accessed from internet. Mosquitto server software supports multiple listeners (the same server can listen to multiple ports and it can have different security settings for each port). There is also the more difficult option to run a HTTPS web interface on the same OpenWrt router and I can write my own scripts that will subscribe to topics and publish data to the web interface.
Because I decided to make a network for things only, any other local clients must use the home network to connect to the broker (a firewall rule will be set to allow this).
OpenWrt configuration
Installing OpenWrt on your router is not the subject of this post. I'll start with a device that's already configured to provide two virtual LANs: VLAN1 is a bridge over some wired ports and WiFi and VLAN2 is the WAN input of the router. How to make this configuration is described in a previous post. VLAN1 is the things network. VLAN2 should be connected to the internet (through a gateway or whatever you use).
Connect using a computer to any LAN ports of the OpenWrt router. Check internet (you should have access to). Open the browser and go to the router IP to access LuCI web interface (openwrt.lan should work unless you bypassed OpenWrt DNS server or changed hostname in settings). Adjust the following parameters:
- Network - Wireless - Wireless Overview - Edit
- Interface Configuration - General Setup
- Mode: Access Point
- ESSID: write something unique, with random characters (i.e.
MQTT-64fe38e6)
- Interface Configuration - Wireless Security
- Encryption: WPA2-PSK
- Cipher: Force CCMP (AES)
- Key: write random characters (i.e.
cwcDKse2qyAd)
- Interface Configuration - General Setup
- (Optional) Network - Interfaces - WAN - Edit
- Common Configuration - General Setup
- Hostname to send when requesting DHCP: MQTT_Broker (or whatever you want) - you will see this in the clients list on your gateway
- Common Configuration - General Setup
- Network - Firewall - Port Forwards - New port forward (needed to connect to broker from the local network - not the things network)
- Name: MQTT
- Protocol: TCP
- External zone: WAN
- External port: 1883
- Internal zone: LAN
- Internal IP address: select router IP
- Internal port: 1883
- Click Add
- Repeat above steps and add a new forward on port 8883 (that's for MQTT over SSL)
- After you see the new forwards in the list, click Save & Apply
- (Optional) Network - Hostnames - Host entries
- Hostname:
mqtt-broker.lan, or any pretty name you want - IP address: choose router IP
- Click Add
- Click Save & Apply
- Hostname:

Port forwardings to router IP
Gateway configuration
Inside the things network, any MQTT client may use either the router IP address or mqtt-broker.lan to connect. But what about clients outside of that network? Looking at the top drawing, I'm referring to local clients in the home network. Those must use the IP assigned to OpenWrt by the gateway. And since we configured OpenWrt WAN port as DHCP client, that IP may change.
To avoid IP changes, we could set OpenWrt WAN to static IP. However, I prefer to keep dynamic IP (DHCP client) and assign (reserve) an IP to the OpenWrt device at my gateway. Doing so, the gateway will not assign this IP to another device.

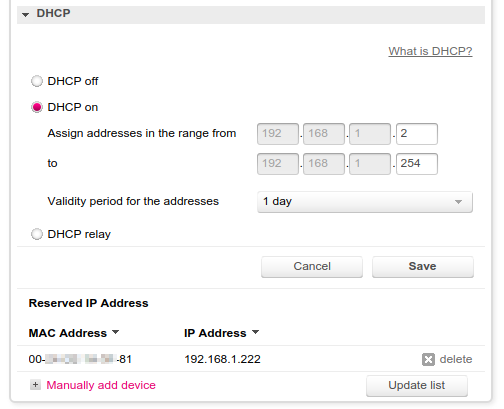
IP reservation for specific MAC address in gateway settings
That's the configuration interface for my gateway. Yours is different. Make sure you assign an IP from the allowable range. If you don't know the MAC of OpenWrt router, you can find it either at the gateway in the clients list (if connected) or in OpenWrt - Network - Interfaces - WAN - Edit. It's at Common Configuration - Physical Settings. After you reserved an IP, reconnect OpenWrt to gateway.
Clients in home network will connect to MQTT broker using the assigned IP. In my example 192.168.1.222. In the next part of this guide, I'll install and configure Eclipse Mosquitto™ on OpenWrt.


nice thank you!
ReplyDeleteSpam comments get deleted, you know...
ReplyDeleteHi, very helpfull description!
ReplyDeleteBut further configuration using mosquitto_passwd and options for creation, encryption of password file did not work: error message - commamd not found
Any ideas? Thx in advance
Krys
mosquitto_passwd is part of MQTT broker program. Install MQTT broker and MQTT client on the opwnwrt router
Deletehi, how did you set OpenWrt WAN to static IP?
ReplyDeleteI stumbled across your posts as I am trying to install an MQTT broker with Home Assistant to query data from a web portal displaying figures from my solar production.
ReplyDeleteI am running this on an ARM board using Armbian and have spent days getting nowhere however; your posts are very well written and clear.
I hope to be able to follow what you have done and finally get things working .
Excellent work and thank you for publishing everything and explaining things so clearly
Thank you. Make sure you see the posts about MQTT on Armbian: MQTT Broker on Orange Pi Zero (Armbian).
Delete