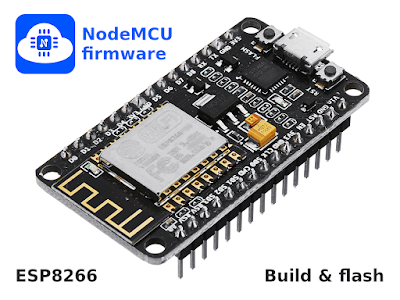
Build NodeMcu firmware on your Linux computer or online, flash it to any ESP8266 development board and start programming with Lua
I got some ESP8266 NodeMcu boards that came with pre-installed firmware. Yet, the first thing I did was to upload the Arduino blink sketch on them using ESP8266 development kit for Arduino. Obviously, this has overwritten the default firmware. Now, I want to try NodeMcu as well. I discovered there is more than a binary that you have to flash to the development boards. In fact, you have to build this by yourself, depending on your needs. I'll overview in this post the available options for building and flashing the firmware using Linux and Windows computers.
NodeMCU is an open-source Lua based firmware for the ESP8266 WiFi SoC from Espressif and uses an on-module flash-based SPIFFS file system. NodeMCU is implemented in C and is now community-supported and compatible with any ESP module. The NodeMCU programming model is similar to that of Node.js, only in Lua. It is asynchronous and event-driven. Many functions, therefore, have parameters for callback functions.

Build firmware
Linux (Ubuntu)
Let's start by installing some prerequisites. Git is required to pull the firmware source code, Python's serial module and esptool are needed to flash the built firmware. Java is required by the IDE I will use.
sudo apt install git python-serial esptool openjdk-14-jre-headless
After installation is completed, you may connect your ESP8266 development board over USB and issue the following command.
esptool flash_id
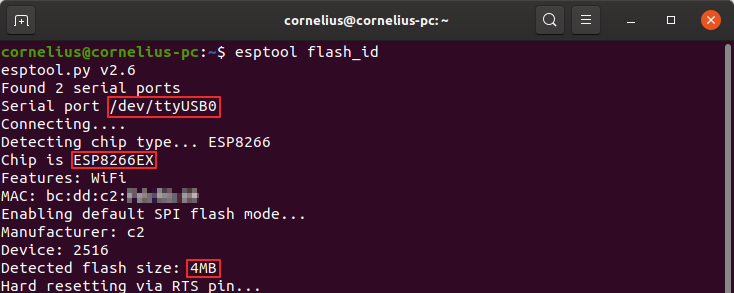
This tool scans all serial ports and identifies ESP8266 development boards. You should see something like this (remember the serial port and flash size).

Detect connected ESP8266 development boards
Let's get to building NodeMcu firmware from source. Note that if you have a Linux computer and a bit of knowledge on the command line this is the fastest way to get the built and customized firmware. There is also a web service that builds the firmware for you. I will talk more about it in the Windows section because those users have no other easy way. Start by downloading the source code.
mkdir ~/nodefw
cd ~/nodefw
git clone --recurse-submodules https://github.com/nodemcu/nodemcu-firmware.git
cd nodemcu-firmware
nautilus `pwd`/app/include
NodeMcu works differently than Arduino C/C++. Depending on what devices and modules you intend to use in your project you will need some 3rd party libraries. These must be selected at this point to be included in the build. The last command should open the file manager in the directory where configuration files are stored.
Open user_modules.h and choose the modules you need. Uncomment the #define lines corresponding to the functions and hardware support you require. When you're done with this, open user_config.h with the text editor. Make sure flash size is correct in #define FLASH_4M. Here you can add client SSL support by uncommenting line #define CLIENT_SSL_ENABLE. There are also other options to configure here such as debugging DEVELOP_VERSION, support for floating-point variables LUA_NUMBER_INTEGRAL (disables it), LFS LUA_FLASH_STORE and FatFS BUILD_FATFS. There are also some module specific configuration files. Those are ucg_config.h, u8g2_displays.h for display libraries and user_mbedtls.h for mbedTLS library. Edit these to fit your needs if you included them in the build. When you're done editing config files, build the firmware and change to the folder containing binaries.
make
cd bin
Online build
Everybody, not just Windows users may use the online build service provided by nodemcu-build.com. It allows you to select the modules you need and you are required to provide an email address to receive the binaries download link. This is a valid option for users that are less experienced with building software from source.
For me, it took no more than 5 minutes since I submitted the build information until I got the email with binaries download links.
Flash the firmware
Depending on the hardware you have, to enable ESP8266 firmware flashing GPIO0 pin must be pulled low before the device is reset. Conversely, for a normal boot, GPIO0 must be pulled high or floating. If you have a development board, you shouldn't have to do anything, since USB-Serial converter will use DTR to set/reset GPIO0.
If you built the firmware yourself, you got two files. Flash both at different addresses as you will see next. If you used the online build service, you got a single binary that must be flashed at 0x00000.
Flashing can be performed with esptool since this command line tool is based on Python and it is cross platform. Use the following commands after you change serial port and flash mode -fm. This is qio for ESP8266 with 512 kB flash, dio for ESP8266/ESP32 with 4 MB flash or more and dout for ESP8285.
esptool --port /dev/ttyUSB0 write_flash -fm dio 0x00000 0x00000.bin
esptool --port /dev/ttyUSB0 write_flash -fm dio 0x10000 0x10000.bin
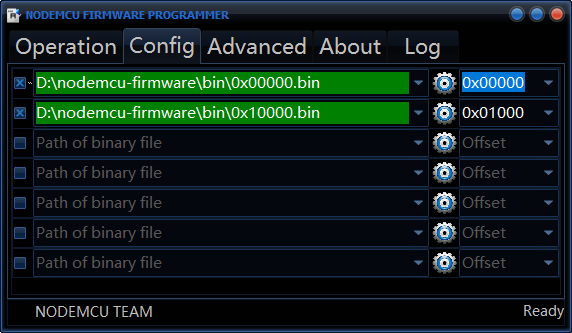
Windows users can use a GUI tool, NodeMcu Flasher. This is how you flash the two binaries. Make sure you select the correct serial port and baudrate.

Flashing two binaries at once using NodeMcu Flasher
At this point, firmware should be on the development board, running. Open a serial terminal with 115200 baudrate (unless you changed it in configuration) and when resetting the board you should see NodeMcu version, build date and some other information.
The first Lua program
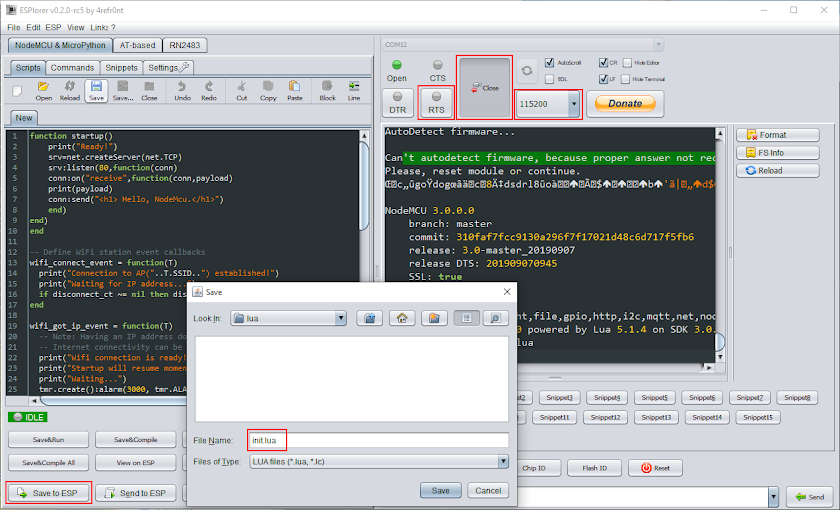
There are multiple tools that you can use to run/flash Lua files on the development board. I will use the Java based ESPlorer cross platform IDE. Launch it, select serial port, baud rate and click Open. If nothing happens, click twice on RTS to issue a board reset or perform a manual reset.

ESPlorer IDE main window
You probably saw that the firmware expects to find a file init.lua that will be executed on startup. Let's create this file.
function startup()
    print("Ready!")
    -- Do whatever you want after this
    -- Call another function or dofile
    srv=net.createServer(net.TCP)
    srv:listen(80,function(conn)
    conn:on("receive",function(conn,payload)
    print(payload)
    conn:send("<h1> Hello, NodeMcu.</h1>")
    end)
end)
end

-- Define WiFi station event callbacks
wifi_connect_event = function(T)
  print("Connection to AP("..T.SSID..") established!")
  print("Waiting for IP address...")
  if disconnect_ct ~= nil then disconnect_ct = nil end
end

wifi_got_ip_event = function(T)
  -- Note: Having an IP address does not mean there is internet access!
  -- Internet connectivity can be determined with net.dns.resolve().
  print("Wifi connection is ready! IP address is: "..T.IP)
  print("Startup will resume momentarily, you have 3 seconds to abort.")
  print("Waiting...")
  tmr.create():alarm(3000, tmr.ALARM_SINGLE, startup)
end

wifi_disconnect_event = function(T)
  if T.reason == wifi.eventmon.reason.ASSOC_LEAVE then
    --the station has disassociated from a previously connected AP
    return
  end
  -- total_tries: how many times the station will attempt to connect to the AP.
  local total_tries = 75
  print("\nWiFi connection to AP("..T.SSID..") has failed!")

  --There are many possible disconnect reasons, the following iterates through
  --the list and returns the string corresponding to the disconnect reason.
  for key,val in pairs(wifi.eventmon.reason) do
    if val == T.reason then
      print("Disconnect reason: "..val.."("..key..")")
      break
    end
  end

  if disconnect_ct == nil then
    disconnect_ct = 1
  else
    disconnect_ct = disconnect_ct + 1
  end
  if disconnect_ct < total_tries then
    print("Retrying connection...(attempt "..(disconnect_ct+1).." of "..total_tries..")")
  else
    wifi.sta.disconnect()
    print("Aborting connection to AP!")
    disconnect_ct = nil
  end
end

-- Register WiFi Station event callbacks
wifi.eventmon.register(wifi.eventmon.STA_CONNECTED, wifi_connect_event)
wifi.eventmon.register(wifi.eventmon.STA_GOT_IP, wifi_got_ip_event)
wifi.eventmon.register(wifi.eventmon.STA_DISCONNECTED, wifi_disconnect_event)

print("Connecting to WiFi access point...")
wifi.setmode(wifi.STATION)
wifi.sta.config({ssid="your wifi ssid here", pwd="your wifi password here"})
-- wifi.sta.connect() not necessary because config() uses auto-connect=true by default
This is based on the official documentation. It establishes WiFi connection, then waits 3 seconds. It's recommended to use this file and after those 3 seconds pass (in function startup()), add your code or use dofile to run another file. It's important to get init.lua right, because an endless loop or reset caused by bad code in this file leaves you with no other option but to reflash the firmware. NodeMcu runs this file at startup by default.
The 3-second delay is very important because if your code fails, you can quickly send over serial terminal file.remove("init.lua") to remove the bad file (even init.lua can be removed). Without this delay, there's nothing you can do.
What's next?
This tutorial is based on the official documentation, which is a good starting point for anyone interested in NodeMcu. The Lua programming language is rather easy to learn and implement on ESP8266. Take a look at the reference manual and specific NodeMcu examples.


No comments :
Post a Comment
Please read the comments policy before publishing your comment.