Showing posts with label Audio. Show all posts

Play audio streams on OpenWrt (Internet Radio)

 Posted by:   Posted on:    2 comments

I own some old ADSL modems that are no longer suitable for modern networks. OpenWrt can be installed on them, but they are limited by hardware to 100 Mbps LAN and 54 Mbps WiFi. Therefore, using these devices as routers, network attached storage or anything else that requires high transfer speeds is no longer wanted. Fortunately, OpenWrt comes with many software packages available to install using its included package manager.

One of the tasks that are suitable for most low-speed OpenWrt routers is audio playing. However, there are some hardware requirements. You need a router on which you can install OpenWrt firmware. It must have at least 8 MB flash storage memory and, the most important: at least one USB port. I haven’t heard of routers with audio output, yet there are plenty with USB ports (for GSM modem or USB storage). With an USB sound card and proper software, you will be able to play audio from any OpenWrt router. In this post I will talk about internet radio streams. However, if you have an extra USB port or you plan to use a hub, you may also play music files from USB drive.
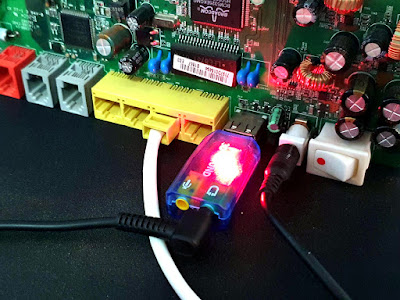
USB audio card plugged in the USB port of the router

USB audio card plugged in the USB port of the router

Stereo tone controller with transistors

 Posted by:   Posted on:    3 comments

The tone controller is a circuit inserted before an audio power amplifier. Its purpose is to allow the user to adjust the gain of specific frequencies of the audio spectrum. Tone controllers range from simple bass boost circuits to complex equalizers. The circuit presented here is a simple one, with a potentiometer which alters the lower third of the audio spectrum (for bass adjustment) and another one which alters the upper third of the audio spectrum (for treble adjustment).

The schematic does not contain a volume adjustment potentiometer, but that can be added before the controller input. The signal input level should not exceed 1 Vp-p. When both potentiometers are turned up to the middle (flat), the relative gain of the circuit is -1 to -2 dB. Therefore, with an input signal of 1 Vp-p, you get no less than 0.8 Vp-p at the output.

Stereo tone controller with transistors

Built prototype of the stereo tone controller

Stereo audio amplifier with TDA2003

 Posted by:   Posted on:    No comments

TDA2003 is an integrated audio amplifier circuit capable of providing up to 10 W into 2 ohms load and 6 W into 4 ohms load when powered at 14.4 V. It is very easy to build a reliable circuit with it because it has short circuit protection. It will withstand a permanent short circuit on the output as long as supply voltage doesn't exceed 16 V. The maximum operating DC voltage is 18 V, however TDA2003 will not get damaged as long as supply voltage is less than 28 V. It comes with integrated thermal limiting circuit.

Having these features, the TDA2003 proves to be a good option for small power amplifiers. It was designed for car audio, that's why it is powered from single supply of about 12 V. Although nowadays it is considered obsolete, there are plenty of electronic parts suppliers which have TDA2003 in stock. At very low prices, by the way. Using the datasheet as source of inspiration, I designed my own PCB for two TDA2003 circuits, to make a stereo amplifier.

Stereo audio amplifier with TDA2003

The TDA2003 amplifier on homemade PCB without heatsink

Audio Amplifier with Common Transistors

 Posted by:   Posted on:    1 comment

Here is the schematic of a small audio amplifier that will provide up to 300mW to an 8 ohm load and can be used in low power devices like battery powered radios. This circuit is an alternative to the LM386 IC. Due to the simplicity of the schematic, the circuit can be built also on breadboard, for those of you who want to experiment and learn how an amplifier works.

The design is straightforward. A common small signal NPN transistor (like BC547, 2N2222, 2N3904, S8050) drives a balanced power amplifier made of similar transistors. The output transistor pairs can be BC327 with BC337 or S8050 with S8550. They must handle peak currents of 300-400mA (this is why BC547/BC557 or 2N3904/2N3906 should not be used here). The amplifier can be powered from a 9V battery or from a 12V power source. The circuit draws a current of about 170mA. Quiescent current is less than 10mA.

Audio amplifier with common transistors build on breadboard
Audio amplifier build on breadboard

A better way to power car audio in home

 Posted by:   Posted on:    8 comments

Usually, car audio systems like CD player or cassette player have good audio amplifiers, with four channels (front L/R and rear L/R) of enough power for in home use. The radio tuner is also of high quality, with automatic best frequency selection and RDS information. Not all car audio systems have audio auxiliary inputs, although with a little tweaking, you can add audio line level inputs to a cassette player so you can use it as audio amplifier with any audio source.

There are plenty of how-to's about this subject. Yet I couldn't find one that handles the memory loss problem. Car audios are designed to be continuously powered by the battery. Therefore, most don't have a permanent storage memory for settings. Upon disconnecting the power, the device loses all audio settings and stored radio stations. This article will deal with the memory loss problem. Unless you will never unplug the DC adapter from the mains, you will need some kind of battery backup system. There are two approaches here: find and power only the CPU from battery or power the entire device from battery.

Car audio powered in home

Car audio powered in home

10W Stereo Audio Amplifier with Transistors

 Posted by:   Posted on:    12 comments

Most audio amplifiers nowadays are built with special integrated circuits. These ICs are getting smaller, but the power they can deliver and efficiency are increasing. The following amplifier is a classic design built with common parts and some power transistors in output stages. It can deliver a maximum of 10 W into 4 ohms speakers on each channel when it is fed with a 0.5 V peak-to-peak signal. Input impedance is above 100 kilo-ohms. The amplifier should be powered from 24 V regulated supply.

The output transistors must be able to handle a collector current of at least 2 A and dissipate at least 20 W. Something like BD237 & BD238 or BD 437 & BD 438 pairs will do. The rest are general purpose transistors such as BC547, BC171, 2N2222, S8050, 2N3904 and their complementary BC557, BC177, 2N2907, S8550, 2N3906 (pay attention to pin order). The drivers of the power transistors, just like them, must be complementary and with similar current gain. So, if you have a hFE meter, it's recommended to test the transistors and match them based on hFE. If you can't measure them, follow the hFE markings. Do not match a BC547B with a BC557C because they have different gains.

10W Audio Amplifier with Transistors

Built channel amplifier (without heatsink)

2.5W Audio Amplifier with Transistors

 Posted by:   Posted on:    No comments

This amplifier is easy to build using common discrete parts. A channel uses only four general purpose transistors (3 NPN like BC547, 2N2222, 2N3904 and 1 PNP like BC557, 2N2907, 2N3906) and two medium power complementary transistors like BD135/137/139 with BD 136/138/140 or MJE200 with MJE210. Almost any pair of complementary transistors will do as long as hFE is greater than 60, maximum collector current at least 1 A and dissipation at least 10 W.

The power transistors must be fitted on a heatsink! They have their collectors electrically connected so you don't have to isolate each other. The heatsink should have an area of at least 40 square centimeters. Note that the heatsink voltage is neither ground or supply voltage so do not connect it with anything else besides transistors. Be careful not to connect it with chassis ground. If you build the other channel for stereo use, do not electrically connect the heatsinks of both left and right channels.


2.5W Audio Amplifier with Transistors