Showing posts with label MQTT. Show all posts

Receive weather station data with Arduino

 Posted by:   Posted on:    6 comments

A while ago (to be more specific two years ago) I used software defined radio to capture and decode RF signal from the outdoor unit of a weather station. This allowed me to emulate the protocol with an Arduino and a cheap 433.92 MHz transmitter and send my own data to the indoor station. I can make my own units if the original outdoor unit fails. The outdoor unit uses on-off-keying (OOK) and sends pulse distance modulated bits, explained in detail in the linked post.

But what about receiving data from outdoor unit(s) with an Arduino? One can add an ESP8266 to capture temperature and humidity and publish data to MQTT, Home Assistant or other IoT servers. Capturing and analyzing pulse timings of a signal was a daunting task for me. However it turned out to be easier than I thought, using an interrupt routine. In this post, I'll explain all the steps required to make a pulse distance modulation (PDM) decoder.

Set up Home Assistant on Orange Pi Zero 3 (part one)

 Posted by:   Posted on:    3 comments

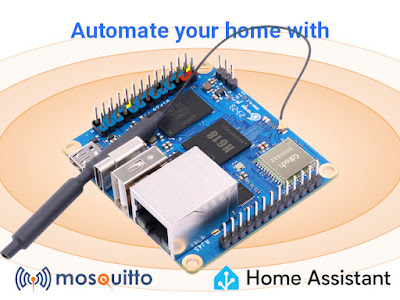
The Orange Pi Zero 3 is a powerful Single Board Computer (SBC) that can serve as the heart of your home automation system. With its compact size, low power consumption, and ample processing power, it's an ideal choice for DIY enthusiasts looking to automate their homes. In this guide, we'll walk you through the steps to set up and use the Orange Pi Zero 3 for home automation. I have previously used a less capable SBC and even an old router to run a self hosted MQTT server. It is time for an upgrade.

The main point of this upgrade is to add functionality beyond MQTT, such as database storage, reports and Home Assistant. I really want the latter since I have some ESP8266 relays and sensors I currently use and I think ESPHome could speed up software development while being easy to integrate with Home Assistant. Note that you may use another SBC from the OrangePi family for this purpose. I chose Zero 3 because it is powerful enough while being similar in size with the existing Zero I currently use.

Set up Home Assistant on Orange Pi Zero 3 (part one)

30A MQTT relay with timer: software

 Posted by:   Posted on:    No comments

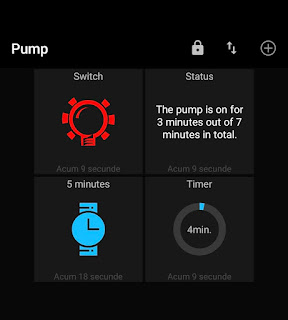
In the previous post I built an ESP8266 controlled 30A relay to automate an irrigation pump. I added a time display to this device because I want to have timer function, to set the pump on for a specified amount of time. I will not be using a web server to control the relay because I want to be able to switch it on from outside of the local network and it is difficult to obtain a properly secured HTTP server on ESP8266. I already did it, but this MCU has limited resources for such purpose.

Since I run a self-hosted MQTT broker on an Orange Pi Zero SBC I will make use of the MQTT capabilities. Orange Pi has a capable CPU for proper SSL encryption and I already made the server secure with self signed SSL certificate. ESP8266 can connect to the server in the local network on the unsecured listener port and that is not an issue since I have control over the devices my local network. Even so, WiFi is password protected. And ESP8266 uses credentials to connect to MQTT broker.

MQTT relay controls in MQTT Dash app

30A MQTT relay with timer: hardware

 Posted by:   Posted on:    No comments

I wanted to automate an irrigation pump, to be able to turn it on and off remotely and set a power-on time limit. I looked for a ready-made solution and I found some products. But none fit my needs. There are mains powered ESP8266 boards with one or more relays, but those relays are common 10A type. After some searching on AliExpress, I found an ESP8266 module with 30A relay, but this one was missing a mains adapter and required DC low voltage supply. This one could have been my choice. After all I only had to get a power supply.

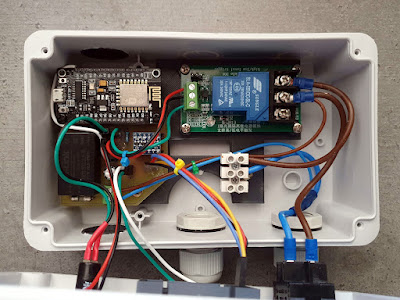
Later, I decided to add a small display to my device so, I ended up making my own PCB. A NodeMcu board is the controller of this device. I added a 30A relay module and used a Hi-Link PCB power supply module to deliver required 5 V. The display is a 4-digit 7-segment TM1637 module which came with another challenge. It is a 5 V device that needs to be controlled by a 3.3 V MCU. I added a level shifter module and designed a PCB to fit all of them (except relay module which has its own PCB).

Electronics for the MQTT switch mounted in a plastic box

Self-signed certificates for MQTT server

 Posted by:   Posted on:    No comments

During the last series of posts, I set up an Orange Pi single board computer running Armbian and I installed Mosquitto on it. My intention is to have a self-hosted MQTT broker for IoT applications. I already have it running with the configuration from previous post and it can be used for local connections in my home LAN and WiFi. Since this is a closed network, behind a firewall running on the Internet gateway I got from my ISP, there is no need for MQTT over SSL. But I need more: I want to be able to connect to MQTT server from remote devices (my Android phone, for example).

To do this, I need to configure a secured listener in Mosquitto and open its port for internet access. Since most ISPs offer dynamic IPs to residential clients, I also need a dynamic DNS service provider to have a domain name which always points to my IP. If you can get a static IP, then you don't need this.

Self-signed certificates for MQTT server

Configure Mosquitto™ MQTT broker on Armbian

 Posted by:   Posted on:    No comments

In the previous post I installed Armbian on an Orange Pi Zero single board computer (SBC). I intend to use this device for IoT and home automation, therefore I wanted to have a running MQTT server (broker). I prefer a self-hosted broker instead of a remote one hosted at a 3rd party company. In this way I have full control and I am sure sensitive data stays in the home network. Nevertheless, current SBC devices have enough processing capabilities and are energy efficient.

In this post I will configure the broker software. I want the server to listen for unencrypted connections on a port available for local clients only. It should also listen for encrypted connections on ports that I will open for remote access. There are two kinds of TLS connections: PSK (pre-shared key) and SSL certificate. The certificate will be self-signed and generated with OpenSSL (in a follow-up post).

Configure Mosquitto™ MQTT broker on Armbian

MQTT Broker on Orange Pi Zero (Armbian)

 Posted by:   Posted on:    2 comments

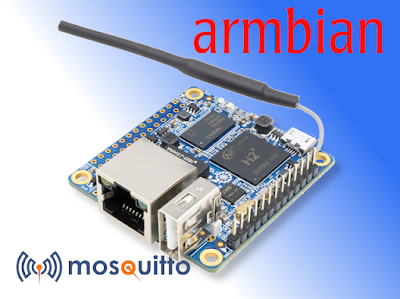
Some time ago I was attempting to install the Mosquitto MQTT broker software on an old router with OpenWrt firmware. I no longer think that is the best option for a self-hosted MQTT broker with the advent of single board computers (SBC) like Raspberry Pi and Orange Pi. To my surprise, the Orange Pi Zero board (with quad core 1 GHz CPU and 256 MB RAM) requires less power to run than an old router (300 MHz single core CPU and 64 MB RAM).

With sufficient processing capabilities, the SBC can run more than the MQTT broker. I’m thinking of turning this Orange Pi board into a Home Automation Gateway which manages local devices and makes data available in a web interface. There is plenty of software support for what I want (I’m thinking of Node-RED with a web-based dashboard). Another good candidate is Raspberry Pi, but because it does not have wired network port (Zero version), I chose Orange Pi.

MQTT Broker on Orange Pi Zero (Armbian)

Configure Mosquitto™ broker with TLS certificate

 Posted by:   Posted on:    4 comments

Following my previous post, you should have now a running Mosquitto based MQTT broker on your OpenWrt router that listens on port 1883 for unsecured clients and on port 8884 for TLS PSK clients. But that's not all. I want to have the broker listen to 8883 port for TLS certificate secured clients. I will use this port for remote clients over the internet.

Of course, the port can be used for local clients that support TLS. This is the highest level of transport encryption available. It's the same encryption used by HTTPS. When you (your browser) send a HTTPS request to a server (website), the server responds with its certificate and public key. The browser has a database of trusted certificate authorities and if the authority that issued the received certificate is in that database, browser will trust the server and will respond with data encrypted with the public key. Server decrypts data with its private key. Client and server will negotiate a one time key that will be used throughout the session.

Configure Mosquitto™ broker with TLS certificate

Install and configure Mosquitto™ on OpenWrt

 Posted by:   Posted on:    6 comments

The previous post was about MQTT security layers, the advantages of running a local MQTT server and how may a network of things be structured. The OpenWrt router should be ready to install and set up the server (broker) software. The software repositories contain two variants of the Eclipse Mosquitto software. One of them is built without SSL support. If you install that one, you won't be able to accept secure clients. The SSL enabled variant requires a bit more internal storage space and that's the main reason they provide both builds.

I'm using a router with Broadcom SoC and 16 MB of internal storage. There's still 86 percent free space after installing Mosquitto, the SSL enabled build. In this post I'll show you how to configure Mosquitto broker to listen to multiple ports and to accept clients with different security settings. This is because not all microcontrollers with network connectivity have enough processing power for TLS/SSL. And, as I said in the previous post, the devices in your local network are behind (at least one) firewall, and as long as no one else has physical access to the network, transport encryption between MQTT clients and server is not really needed. However, TLS/SSL is required for remote clients, over internet.

Install and configure Mosquitto™ on OpenWrt

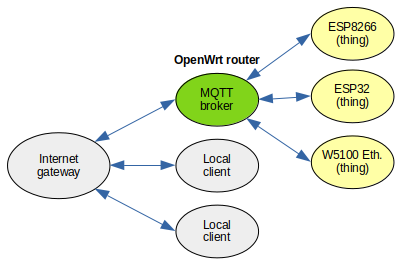
Run a local MQTT broker on OpenWrt router

 Posted by:   Posted on:    7 comments

Nowadays, microcontrollers with internet connectivity are cheap and popular. Actually, not quite internet connectivity, but network interface (mostly wireless). Also, to those MCUs that do not feature this, you can connect various network or WiFi modules (known as shields). It's now easy to connect almost anything to the big network starting from a simple LED or relay.

There are plenty of projects on this topic. Most of them make use of development boards based on Espressif platform, because they are cheap and have built-in wireless LAN connectivity. An you can run basic web servers on these that offer a web interface where you can display or change parameters from any device with web browser. But that's not what everybody needs. Sometimes, the development board is just a member in a network that includes other things too.

A common protocol was needed to allow communication between devices in the network of things. Actually, one has been around a while, way before these development boards became so cheap and available. It's the Message Queuing Telemetry Transport protocol (or MQTT), which is now an ISO standard. Used wherever small amounts of data needs to be transferred, it works on top of TCP/IP.

Run a local MQTT broker on OpenWrt router