Showing posts with label Graphics. Show all posts

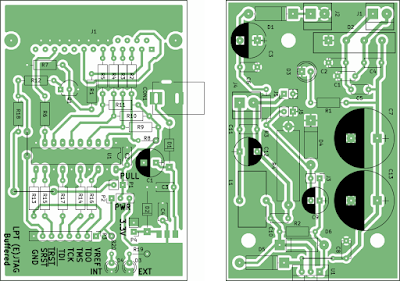
Generate good looking PCB artwork from KiCAD

 Posted by:   Posted on:    2 comments

KiCAD is probably the most complete opensource EDA suite. It comes with a schematic editor, a PCB designer and a 3D viewer. PCB designs can be exported to multiple formats or printed directly from the software. Although the plotting (printing) options are quite advanced, there aren't options for overlaying different layers with different colors.

This tutorial will show you how to create PCB artwork that looks good on display or print and that is intended only as a guide to the reader, not as a source for manufacturing PCB. The result will be a greenish PCB (or any color you want) with silkscreen on top of it. This is probably something you already seen in electronics publications.

There are many ways of doing this. All you need to start are the PDF files plotted by KiCAD and some image editing software (I prefer opensource tools: GIMP or some ImageMagick scripting).
Generate good looking PCB artwork from KiCAD

[Video] Render 3D images of EAGLE PCB projects

 Posted by:   Posted on:    11 comments
This is a video follow-up of my previous tutorial about EAGLE and POV-Ray. I will outline below the main steps that you will see in the video and I will continue to improve the result at the end of this post.

If you haven't read about this before, EAGLE is a schematic capture and circuit board design software. The circuit boards can be processed with a set of scripts and converted into POV-Ray files. In this way you can render great looking 3D pictures of the circuit boards. All used software is available for all major operating systems. The video presents only Linux Ubuntu installation and configuration.

EAGLE circuit board rendered with POV-Ray HDR lighting

3 Large image viewers for Linux

 Posted by:   Posted on:    1 comment
Recently, I wanted to view some large images of electronic schematics in Linux (Ubuntu). I had two TIFF images, one of 140 MP (24193 x 6489 px) and a smaller one of 44 MP (8772 x 5020 px) both 1-bit monochrome compressed with CCIT G4 algorithm.

So I tried to open them with the default associated program (Eye of GNOME) and before any image was displayed, my 2 GB RAM computer started swapping to make room for eog process. Therefore I needed other image viewers.

Here is a comparison of some free image viewers that run on Linux and can display large images using low RAM. I compared two features: speed of zooming/panning/dragging and memory usage. I used my two images for comparison, thus 44 MP displayed as RGB takes (8772px * 5020px * 24bpp) / 8 / 1024 / 1024 = 126 MB and 140 MP takes (24193px * 6489px * 24bpp) / 8 / 1024 / 1024 = 450 MB.

Therefore any viewer that uses more than RAM than the uncompressed RGB image size is useless for large images.

Large image viewers for Linux

ScanTailor Fix DPI dialog

 Posted by:   Posted on:    No comments
ScanTailor is a scan post-processing software that can improve significantly your scans and reduce the file size of your e-books. But it needs high quality scanned images above a threshold considered by it 300 DPI. The purpose of this post is to understand the Fix DPI dialog in ScanTailor. If you don't see it when loading images everything should be OK and you can continue processing.

ScanTailor Fix DPI dialog screenshot
The Fix DPI dialog

High quality scanning vs. small file size

 Posted by:   Posted on:    No comments
This post will not talk about scanning only, but about the whole process of turning a sheet of paper, a magazine or a book into a high quality digital document of the smallest possible size. Nothing will be lost during the conversion as lossless compression will be used and OCR will be run on documents. A low quality scan is hard to read (impossible to run OCR). A high quality scan must preserve as much detail as possible, must have the correct page size (when printed at 100%, the resulting copy should be exactly the same size as the original), must load as quick as possible on low-end devices and shouldn't eat the whole drive space. Software processing of the raw image from scanner plays a very important role. Yet, if the image from scanner has a low resolution, further processing is useless and may have negative results. All software used in this tutorial is free (some apps are open-source). But let's start with the basics.

High quality scanning vs. small file size

Draw electronic schematics using LibreOffice

 Posted by:   Posted on:    8 comments
Draw is a powerful vector graphics drawing software. It is part of the free office suites LibreOffice and Apache OpenOffice.

There are a lot of free EDA software solutions but none of them allows users to 'customize' the schematics as they want (for example part colors - outline, background, including high resolution images in the schematic etc.). This tutorial will cover some aspects of drawing schematics in Draw. Similarly, schematics can be drawn in any other graphics software (for example Inkscape, even GIMP and Scribus).