Showing posts with label Linux. Show all posts

Basic Homelab running on low power NUC

 Posted by:   Posted on:    No comments

 Generally speaking a Homelab is a personal, non-commercial environment where individuals can set up, experiment with, and manage their own IT infrastructure. This can include a variety of hardware and software components, such as servers, networking equipment, virtualization platforms, storage systems, and more. However most people only need to host a few services such as home automation, personal websites, media servers or backup and storage.

There are plenty of videos on YouTube where users are showcasing their homelab setup, some of which are pretty advanced setups with rack-mounted servers and professional-grade networking gear. In fact, most users will never need all these and when you start a homelab you begin with a list of services you want to host.

Basic Homelab running on low power NUC

IMSProg and other Linux utilities for CH341A

 Posted by:   Posted on:    6 comments

It was July 2017 when I ordered an EEPROM programmer I found on AliExpress for only 2.13 USD with free shipping. It wasn't a surprise it came without any kind of documentation. So I began searching for information since I didn't knew how to use it or what PC software I need to read a memory chip. In fact, I didn't even know how to place a chip in the programming socket. I gathered all information about the programmer hardware in this post. At that time I wasn't expecting this programmer to become so popular, still being used today.

The CH341A MiniProgrammer and other programmers based on this controller are affordable USB programmers used for reading and writing EEPROM chips and flash memory. They are widely used by hobbyists and technicians for tasks like flashing BIOS chips, recovering data from bricked devices, and working with various types of EEPROM and SPI flash memory chips. Yet, with all this popularity, the only (probably) official software for this programmer is Windows-only, hard to get and some of the alternatives come from not very trustful sites. Let's see what is available for Linux (Ubuntu).

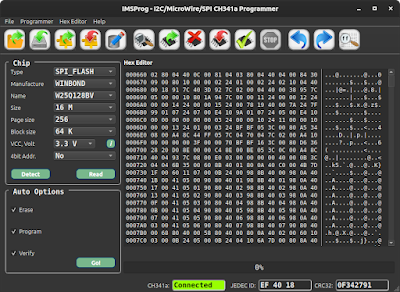
Reading SPI Flash with IMSProg

Change default open with application in Ubuntu

 Posted by:   Posted on:    5 comments

With the new Ubuntu 23.04 release I found myself struggling to find a valid answer to a very simple task. I own a 3D printer and I design stuff in FreeCAD, then export to STL and load this in Cura to slice it and produce gcode for printer. If in Windows 11 there is a 3D viewer application which opens STL files, Ubuntu doesn't come bundled with a similar app and I hate loading every STL file in Cura just to see the 3D model. However, there is fstl, which I found it to be exactly what I was looking for: it is lightweight and it opens STL files.

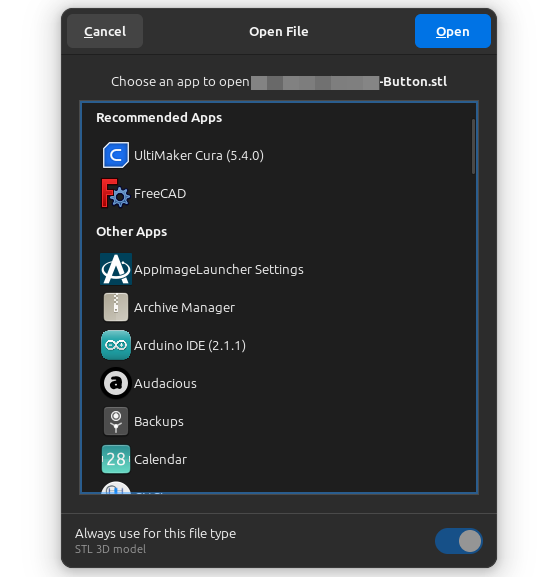
I installed it from default repositories with sudo apt install fstl. Although this is a GUI app, it can only be started from command line, having no desktop entry to open it from Apps. I didn't have a problem with this, since I knew I could select any executable to open a file with. However, this is is no longer true. The Open With dialog no longer allows users to choose something else besides installed applications.

Open With dialog in new Ubuntu versions

Set full RGB to HDMI monitor on Ubuntu

 Posted by:   Posted on:    17 comments

Most common monitors nowadays have 1920x1080 resolution, same as HD TVs. When this resolution is available, some video card drivers, on Linux, will output limited RGB pixel ranges, considering the monitor as a TV. Instead of 8-bit per color (0 to 255), the video card outputs a limited range of 16 to 235 which causes washed out colors, with less bright white and less dark black. This may not be obvious at first sight, especially for regular users when switching to a new monitor.

Unfortunately, there is no straight fix for this issue on Ubuntu (or other Linux distributions). There are no options in settings app. More than that, the way of fixing this has changed with the new Ubuntu 21.04 which uses Wayland instead of Xorg display server. In this post I will show you how to address this issue on both display servers and get the expected picture colors on your HDMI monitor with Ubuntu.

Set full RGB to HDMI monitor on Ubuntu

Install Oracle Java on Linux Ubuntu

 Posted by:   Posted on:    1 comment

Java is a cross-platform development platform used by many applications. If you want to run Java based applications, you must install a runtime. Java is developed by Oracle. There are two packages: JDK (Java Development Kit) and JRE (Java Runtime Environment). While the first is needed to develop Java applications, for running them you need the runtime.

Due to licensing, on Linux you have the possibility to install only OpenJDK from software repositories. That is an open source GPL licensed JDK edition. Well, I had this one installed (package openjdk-8-jre) on Ubuntu and I was facing some problems. JabRef, a references manager application, wouldn't run. Initially I thought there is something wrong with the current release. Later I installed (the GUI installer worked) STM32CubeProgrammer, a programming utility for STM32 microcontrollers. Neither this one would launch.

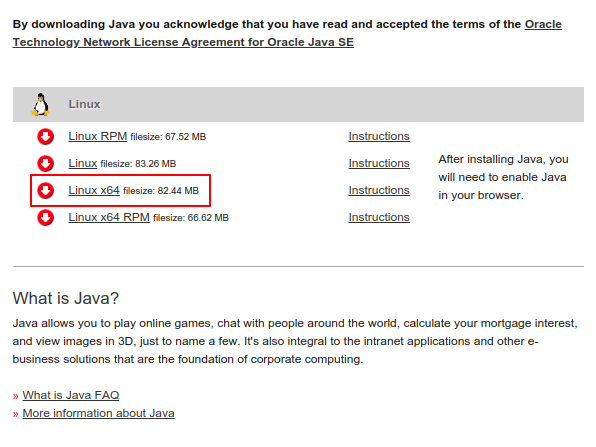
Java JRE Download page for Linux

Java Runtime Download page for Linux

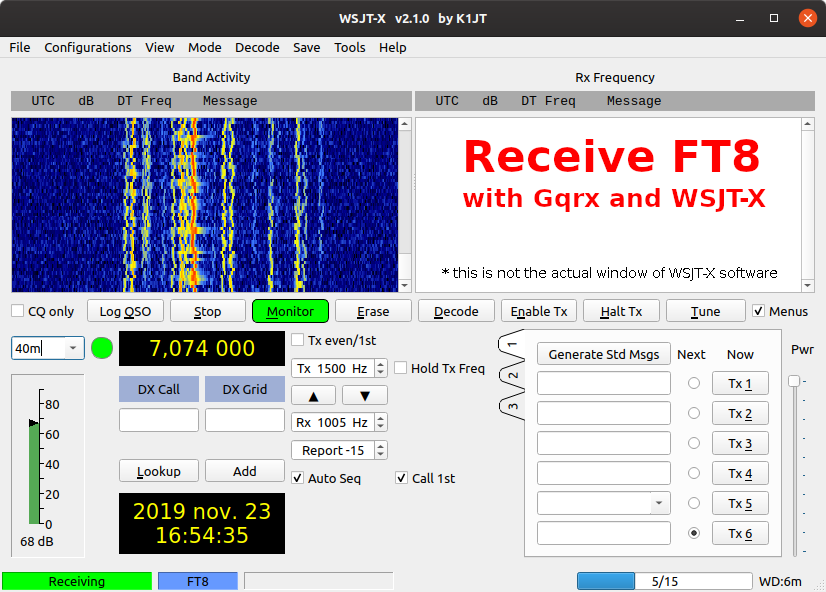
Receive FT8 with WSJT-X and Gqrx (Linux)

 Posted by:   Posted on:    5 comments

FT8 has become the most popular data mode for ham radio. It is a digital mode created by Joe Taylor, K1JT and Steve Franke, K9AN which uses 8-FSK modulation. A transmission lasts for exactly 12.64 seconds and occupies about 50 Hz bandwidth (8 tones at 6.25 Hz spacing). FT8 works very well even with a lot of noise and it is simple to receive and transmit using the computer soundcard and SSB transceiver.

This post will focus on receiving only. We'll decode FT8 messages using HackRF hardware with software defined radio (SDR) application. However, SDR tools come with support for common analog modulation. For FT8 decoding and generation there is WSJT-X software, but this one accepts only audio input. So, I'll be using a SDR application (Gqrx) set to SSB (upper side band) demodulation and I will pipe its audio output to WSJT-X. The latter can be configured to automatically set the frequency of the SDR software. Besides configuration, a virtual audio cable is needed.

Receive FT8 with WSJT-X and RTL-SDR

Configure Mosquitto™ broker with TLS certificate

 Posted by:   Posted on:    4 comments

Following my previous post, you should have now a running Mosquitto based MQTT broker on your OpenWrt router that listens on port 1883 for unsecured clients and on port 8884 for TLS PSK clients. But that's not all. I want to have the broker listen to 8883 port for TLS certificate secured clients. I will use this port for remote clients over the internet.

Of course, the port can be used for local clients that support TLS. This is the highest level of transport encryption available. It's the same encryption used by HTTPS. When you (your browser) send a HTTPS request to a server (website), the server responds with its certificate and public key. The browser has a database of trusted certificate authorities and if the authority that issued the received certificate is in that database, browser will trust the server and will respond with data encrypted with the public key. Server decrypts data with its private key. Client and server will negotiate a one time key that will be used throughout the session.

Configure Mosquitto™ broker with TLS certificate

Install and configure Mosquitto™ on OpenWrt

 Posted by:   Posted on:    6 comments

The previous post was about MQTT security layers, the advantages of running a local MQTT server and how may a network of things be structured. The OpenWrt router should be ready to install and set up the server (broker) software. The software repositories contain two variants of the Eclipse Mosquitto software. One of them is built without SSL support. If you install that one, you won't be able to accept secure clients. The SSL enabled variant requires a bit more internal storage space and that's the main reason they provide both builds.

I'm using a router with Broadcom SoC and 16 MB of internal storage. There's still 86 percent free space after installing Mosquitto, the SSL enabled build. In this post I'll show you how to configure Mosquitto broker to listen to multiple ports and to accept clients with different security settings. This is because not all microcontrollers with network connectivity have enough processing power for TLS/SSL. And, as I said in the previous post, the devices in your local network are behind (at least one) firewall, and as long as no one else has physical access to the network, transport encryption between MQTT clients and server is not really needed. However, TLS/SSL is required for remote clients, over internet.

Install and configure Mosquitto™ on OpenWrt

Receive DRM Radio on Linux with Gqrx and Dream

 Posted by:   Posted on:    6 comments
DRM (Digital Radio Mondiale) is the universal, openly standardised digital broadcasting system for all broadcasting frequencies, including the AM bands, as well as VHF Bands. The great flexibility of DRM supports all types of coverage needs – from local, regional, nation-wide to international. If you want to listen to DRM broadcasts, you need a dedicated receiver or a software radio. This post will focus on the cheaper method, the software defined radio (SDR).

SDR performs demodulation in software. The RF signal is sampled by a high speed ADC (analog-digital converter) and sent to a computer which does the filtering, amplification, demodulation and decoding of the signal. The cheapest hardware for SDR is the popular RTL2832U based DVB-T stick.

Most DRM broadcast can be found in SW bands. Here comes an important issue. The tuner from the DVB-T stick can't receive this band. One of the solution is to add a frequency downconverter. Or you can simply disable the tuner and feed RF straight to the ADC. I wrote about RTL2832U direct sampling in this post. This method has some limitations, but nevertheless it should provide satisfactory results.

Dream decoding a DRM broadcast

Script to compile and install PulseView on Ubuntu

 Posted by:   Posted on:    2 comments
PulseView is an opensource GUI for sigrok. It displays recorded waveforms from logic analyzers and oscilloscopes and it can perform various signal measurements and digital protocol decoding. Being opensource and Qt based, it is also cross platform. You can find it in the Ubuntu repositories, but the version is rather old and you'll be missing some new features and protocol decoders.

You will find in this post a script based on building instructions from official sigrok/PulseView wiki that automatically downloads, builds and installs all required dependencies and PulseView itself. The script has been written and tested on Ubuntu 17.10 but it should work on other apt based distros.

Script to compile and install PulseView on Ubuntu

Virtual Audio Cable in Linux Ubuntu

 Posted by:   Posted on:    7 comments
If you ever wanted to pipe an audio stream from an application to another, you probably know that there are some virtual sound card drivers available for Windows. But what about Linux? Well, there are a lot of options, some being more complicated than others.

You probably need to do audio piping to record an audio output or to use SDR tools which only support audio input. You don't have to use a real cable to wire the sound card output into line in. The software approach is better. There is more than one way to do this in Linux. We'll look into Pulseaudio and ALSA, the sound servers used by Ubuntu. Depending on what application you use, you may need to configure the virtual connection on one or the other server.
Virtual Audio Cable in Linux Ubuntu

PonyProg release 3.0 comes with modern UI

 Posted by:   Posted on:    2 comments
PonyProg is a software application that can read, write and program various memory chips and microcontrollers using the simplest possible interface: a serial port adapter. This adapter consist of only some resistors and some voltage limiting zener diodes. However, this approach has a big downside nowadays. It doesn't work with USB to serial converters. And computers with a real serial port are becoming very rare.

If you still have an older computer with a motherboard serial port, you may take into consideration building the serial adapter used by PonyProg, because it is easy to build and probably the cheapest programmer possible. The schematic of the interface can be found at the author's page (SI-Prog by Claudio Lanconelli).

Currently, PonyProg only support SI-Prog or other serial based programmers and some parallel port programmers. With serial port, it communicates by bit-banging various protocols to the signaling lines contained in the RS232 interface (RTS, CTR and DTR). It would be nice if a future version would support the modern USB based programmers (like the CH341A MiniProgrammer) which lack a good software.

PonyProg release 3.0 comes with modern UI
PonyProg 3.0 main window after reading an I2C EEPROM

Using Magix USB-Videowandler 2 on Linux

 Posted by:   Posted on:    11 comments
Videowandler 2 is an USB analog video capture card. There is no official driver support for Linux and the device does not work when you plug it in. According to lsusb, the device is Afatech, which is totally wrong. The kernel only loads modules for USB audio - and this is the only thing that works (the audio input appears as a separate sound card).

Videowandler 2 is based on eMPIA 2861 USB chip. Video conversion is done by SAA7113 and audio conversion by EMP202. The IDs of the device are 1B80:E349. When opening the case, you may find printed on the board UB317 Ver:A or UB315 Ver:C. The latter my be identical to Kworld UB315 but I’m not sure.

Magix USB-Videowandler 2 board. Photo by Christian Enders.

Add and configure WAN port on OpenWrt

 Posted by:   Posted on:    8 comments

OpenWrt is a Linux based, embedded operating system for networking devices. Besides being open source, it is highly configurable and versatile. This post will show how to configure one of the LAN ports as WAN input (for xDSL routers, which have the WAN internally connected to the modem). There are no opensource drivers for ADSL op OpenWrt and this feature is therefore unavailable. It doesn't matter anyway, since DSL limited in bandwidth and is losing its popularity.

Many DSL routers are in fact more powerful platforms, with improved hardware, than ordinary routers. If you want to connect the router to wired LAN internet this is what you should do. I've done this on a router with a development snapshot installed (the difference is that development versions do not come with web interface preinstalled). If you have a regular release, you can skip LuCI installation, as you already have access to the web interface of the router.

Install CadSoft EAGLE on Linux

 Posted by:   Posted on:    No comments
EAGLE is a complete EDA software with schematic capture and printed circuit board design. It has a free version that can be used for personal and non-commercial purposes to design circuit boards smaller than 100 x 80 mm and with no more than two copper layers. Another advantage of EAGLE is that it runs on all major operating systems.

The Linux version is supplied as an architecture dependent self extracting run archive. It can be installed on most distros by executing the downloaded file. There is however one small issue. The installer does not create a desktop entry for the main EAGLE executable. Therefore you have to navigate to the folder where it is installed each time you want to launch it.

Besides showing how to install it (on Ubuntu), this article will give you a simple desktop entry file that will bring a shortcut to EAGLE in your distro application menu. Note that you will have to change version numbers accordingly, because EAGLE is updated frequently.

Install CadSoft EAGLE on Linux

Install WinUSB on Ubuntu 16.04 LTS

 Posted by:   Posted on:    No comments

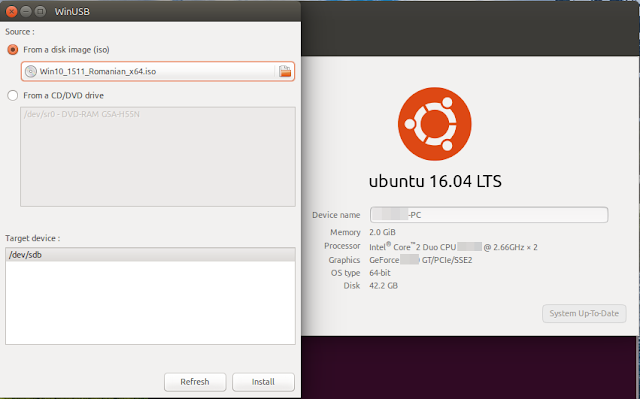
WinUSB is probably the only GUI tool that allows you to create bootable USB drives with Windows from Linux. It hasn't been updated for a long time and there are no packages for newer Ubuntu versions. Until the release of 16.04, WinUSB could be installed from existing DEB packages for previous Ubuntu releases. But things have changed with the update of wxWidgets to version 3.0 in the default repositories. WinUSB GUI depends on wxWidgets > 2.8.4 and all curent builds are based on 2.8 releases of the library.

Let's mention again that WinUSB can't make UEFI bootable drives! Only the old MBR type and only NTFS formatted.

This guide has also been tested on Ubuntu 16.10. If you're using an older version of Ubuntu you may get WinUSB working by following this guide. Otherwise, you need to compile it with wxWidgets 3.0. This article will describe the procedure plus the extra tweaks you must make to ensure WinUSB works as it should.

Install WinUSB in Ubuntu 16.04 LTS

Fix boot splash screen (Plymouth) on Ubuntu

 Posted by:   Posted on:    4 comments
Plymouth is the Ubuntu application that displays the graphical splash screen when booting and shutting down the system[1]. It is long known that it has problems with proprietary Nvidia drivers. While on some computers it starts in low resolution mode, on others it works in text mode. It is claimed that this happens because Nvidia drivers load at a later point and are not available for GRUB and Plymouth[2]. Usually, Plymouth uses KMS (Kernel Mode Setting) to display graphics, but with proprietary drivers you must configure it to use framebuffer instead[3].

Fix boot splash screen (Plymouth) on Ubuntu

6 PDF page cropping tools for Linux

 Posted by:   Posted on:    4 comments
If you ever needed to crop pages of a PDF document and you are using a Linux computer here are six tools that can help you. All are native Linux applications, some are opensource, but most important all are free.

I looked for the following features at these applications: the ability to select only a subset of pages from the document to crop, different crop boxes for each page and the way of selecting crop box (automatically, WYSIWYG or by measurement units).

Here are the six Linux applications that will help you when you need to crop a PDF. This is just a list, not a ranking.

6 PDF page cropping tools for Linux

How to OCR to searchable PDF in Linux

 Posted by:   Posted on:    2 comments
There are multiple OCR (optical character recognition) engines for Linux, but most have a major drawback. They can only export plain text of the OCR'ed image and do not support embedding text into the PDF in order to make a searchable PDF.

By searchable PDF, we refer to a scanned PDF document that contains invisible OCR'ed text over the scanned image. The text should have the right size in order to be placed over the text portions from image. Every word from the text layer should overlay exactly on the portion of the image that contains that word.

Here are two software solutions that are able to create searchable PDFs. One is a native Linux OCR engine and the other is a free PDF reader with OCR capabilities running in Wine.

How to OCR to searchable PDF in Linux

How to compile and set up Dream DRM on Ubuntu

 Posted by:   Posted on:    7 comments
Dream is an open source software receiver and transmitter for DRM (Digital Radio Mondiale) standard. It is a cross-platform application, yet there are no up-to-date Linux packages for major distros. I tried to install existing packages and failed to launch Dream with a segmentation fault.

So I decided to build from source. Dream needs Qt development kit and some other libraries. For audio decoding and encoding, AAC libraries are needed. These are available in repositories, but most of the time they are compiled without DRM support. I will show you how to compile them with DRM support and make Dream detect them.

Update: Tested and working on Ubuntu 16.04 and 16.10.

The instructions below are based on the official instructions on Dream website. I updated them to work with newer Ubuntu releases and I also added a Desktop entry, so you can launch Dream from Dash. It should be noted that the source compiles on Qt5, yet Dream doesn't work (segmentation fault).

How to compile and set up Dream DRM on Ubuntu